
Log growing
How to Inoculate Mushroom Logs with Sawdust Spawn
8 min read
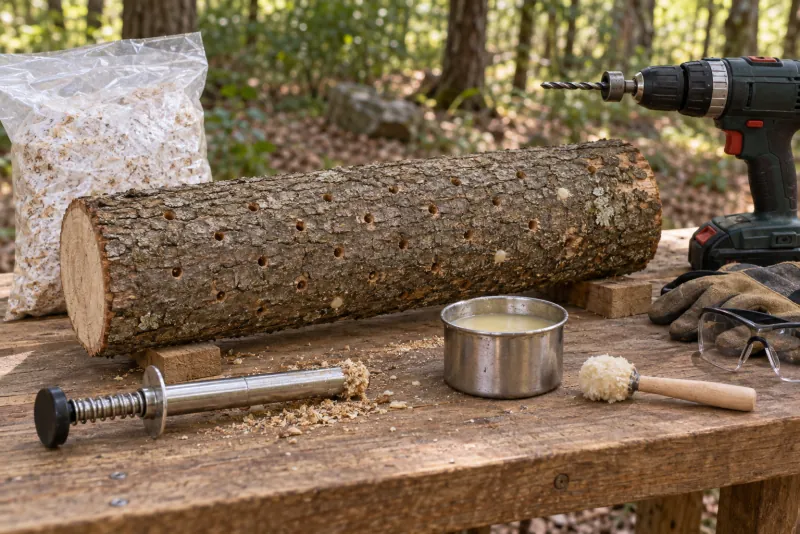
At first glance, inoculating a mushroom log looks almost too simple: drill some holes, add spawn, and cover them with wax.
That really is the basic process. But each step has a purpose. The holes distribute the fungus throughout the wood, the sawdust spawn gives it several established starting points, and the wax keeps those points from immediately drying out.
This guide covers the standard drill, fill, and wax method using sawdust spawn. It isn’t the only way to inoculate a log, but it is widely used and gives new growers a good foundation for understanding the process.
Start with the right wood
Use healthy wood from a living hardwood tree rather than old firewood or a log that has been lying on the ground. Wood that is already dead, decaying, or badly dried may contain other fungi before your mushroom spawn ever reaches it.
The bark should be mostly intact. Bark helps the log retain moisture and protects the wood while the mushroom grows through it.
Try to inoculate soon after cutting. A useful general window is between one day and three weeks, with sooner usually being better. Keep the logs shaded during any delay so they do not bake in the sun or lose unnecessary moisture.
The mushroom must also be compatible with the tree species. Shiitake is commonly paired with oak, while many oyster mushrooms can grow on a broader range of deciduous woods. A hardwood compatibility chart is a starting point, not a promise that every combination will perform equally well.
If you’re still choosing or cutting your wood, start with our guide to selecting trees for mushroom logs.
What you will need
For the standard sawdust-spawn method, gather:
- Fresh hardwood logs with sound bark
- Sawdust spawn of a suitable mushroom species and strain
- A drill
- A drill bit with a depth stop
- A sawdust-spawn inoculator
- Food-grade cultivation wax
- A wax applicator or dauber
- A safe pot and heat source for melting the wax
- Labels or tags
- Suitable eye, hearing, and hand protection
Commercial shiitake growers commonly use logs around three feet long and four to six inches in diameter. Smaller logs are easier to handle but dry more quickly. Larger logs hold moisture well but become heavy surprisingly fast.
A common sawdust-spawn setup uses a 7/16-inch drill bit and holes approximately 1¼ inches deep. Your bit, depth stop, and inoculator need to work together, so follow the measurements supplied with your equipment when they differ.
For help sourcing log-growing tools and wax, see our tools and supplies guide.
Drill a staggered pattern
Begin roughly an inch from one end of the log and drill a row of holes along its length. Space the holes about three inches apart.
Turn the log and add another row three to four inches from the first. Stagger the new holes so they sit between the holes in the previous row. Continue around the log until the pattern resembles a loose series of diamonds.
One useful rule of thumb is to drill about as many rows as the log has inches of diameter. A six-inch log would therefore receive roughly six rows. Depending on its size, an average log may have 30 to 40 holes.
The exact number is less important than good, even coverage. You are creating many points from which the mycelium can enter the sapwood and eventually meet as it colonizes the log.
Try not to tear up the bark while drilling. Bare patches, branch wounds, and other damaged areas can also be drilled, filled, and sealed.
A normal electric drill is adequate for a modest number of logs. High-speed angle-grinder setups are much faster for larger batches, but they require an adapter and drill bit specifically rated for that speed. Never put an ordinary drill bit into a high-speed grinder; it may shatter.
Pack each hole with spawn
Sawdust spawn is sawdust already colonized by the mushroom’s living mycelium. It is not loose mushroom spores.
Load the inoculator from the bag or container of spawn, place it over a hole, and eject the spawn firmly into the wood. The hole should be completely filled, with the surface of the spawn sitting slightly below the bark—about one-eighth of an inch is a useful target.
Firm packing matters. A loosely filled hole leaves unnecessary air space and can dry more easily. Keeping the spawn just below the surface also leaves enough room for the wax to form a secure seal.
Handle the spawn as little as practical and keep the work area reasonably clean. Outdoor log inoculation does not require laboratory sterility, but dirt, old wood debris, and repeatedly touching the spawn do not help.
Seal the holes with wax
After filling the holes, cover each one completely with food-grade wax intended for mushroom cultivation.
Wax helps retain moisture around the spawn and creates a temporary barrier against insects and competing organisms. It should cover the full opening and adhere to the surrounding bark rather than sitting loosely on top.
Follow the wax supplier’s heating directions. Melted wax can cause serious burns and may ignite if overheated or exposed to sparks or flame. Keep the wax station steady, attended, and separated from drilling equipment.
Completely waxing the cut ends of each log is optional. Some growers do it in dry conditions, while others leave the ends uncovered so the logs can absorb water more readily. Sealing the inoculation holes and any obvious damaged areas is the important part.
Label the log before you forget
A newly inoculated log looks like every other newly inoculated log.
Label it with at least:
- Mushroom species
- Strain, if known
- Tree species
- Inoculation date
This may feel unnecessary when you are working with only a few logs. Several months later, once they have been moved and stacked with others, memory becomes much less dependable.
Good labels turn future harvests into useful information. Without them, you may know that something worked without knowing which combination produced it.
Move the logs into shade
Once inoculated, the logs need time for the mycelium to move from the spawn into the surrounding wood. This quiet period is called colonization or spawn run.
Place the logs somewhere protected from direct sun and drying wind. A shaded woodland setting is ideal, although shade cloth or another well-ventilated shelter can also work.
The goal is not to keep the logs constantly wet. It is to prevent prolonged drying while still allowing air to move around them. Local rainfall, humidity, tree species, log size, and stacking method will all affect how quickly moisture is lost.
Logs can be arranged in crib stacks, lean-to stacks, or other stable configurations. Whatever arrangement you choose, make sure the pile cannot roll or collapse.
Then comes the waiting
Nothing dramatic happens immediately after inoculation. Most of the important activity is taking place inside the wood.
As a broad guide, oyster logs may colonize in roughly four to twelve months, while shiitake logs commonly take six to eighteen months. Actual timing varies with the mushroom strain, wood species, log diameter, weather, moisture, and time of year.
You may eventually notice pale or whitish growth near the cut ends, but surface appearance alone does not always prove that the entire log is ready.
Some growers allow their logs to fruit naturally when the weather is favorable. Others force fully colonized shiitake logs to fruit by soaking them. In either case, trying to force an incompletely colonized log does not make the fungus finish faster.
For stacking, moisture, monitoring, and fruiting after inoculation, continue with our mushroom-log aftercare guide.
Mistakes that make the job harder
Most problems begin before the mushrooms ever appear.
Common mistakes include:
- Starting with old, rotten, or badly dried wood
- Waiting too long after cutting before inoculating
- Choosing a mushroom that is poorly matched to the tree
- Damaging large areas of bark during handling
- Drilling holes that do not match the inoculator
- Packing the spawn too loosely
- Leaving filled holes incompletely sealed
- Allowing inoculated logs to sit in direct sun
- Forgetting to label the species, strain, wood, and date
- Using drill bits or adapters not rated for high-speed equipment
None of this makes log growing complicated. It simply means the early work matters.
The basic idea is straightforward: start with sound fresh wood, distribute healthy spawn throughout it, protect those entry points, and give the fungus enough shade, moisture, and time to take over.
After that, much of the work belongs to the mycelium.